

The die was cast a few weeks ago
The same 5 Rejects, got together for Round 2
The 2nd Battle of New Brunswick
After our bashing at the Battle of New Brunswick where myself and Ian were forced to retreat after being mauled by the British Lion (John & Surj) we were determined to fly the Star & Stripes high!
We learned a few things during our previous defeat and planned not to make the
same mistakes again??

The battle field above is a continuation of the 1st days game, just further south, the first 2 feet on the left were where we, the Americans set up upon during the last game.
Postie went through all casualties from the last battle and threw for casualties to come back for the second day. Some units luckily got large numbers back and some didn't.

Ian took command of our side as I had the last game, we also had a new General on the
tabletop, none other than Mr Washington himself!! Unfortunately though, as we
weren't playing an historical battle, Ian had to throw for his leadership. And as per
usual it didn't go that well!!!
Washington was no better than our last leader Major-General Lincoln, which still gave the Brits a plus 2 to their initiative throw!!!
Damn!
We also got an extra brigade of 3 Veteran line units, Ian took these under his command.
We did also swap our forces around the field of battle. As the French were quite static troops we put them on our right, on a hill, making a nice defensive position.
While I took the left....

Surj and John surprised us both with their setup, leaving the Hessians on their left to face
off the French, then they placed their depleted brigade all bunched up on the right flank, leaving their centre quite exposed??

Them bunched up Brits!
My brigade in the centre held in reserve.

Ian's French on the hill, with Mr Washington.

The first turn, bought us 2 surprises??
1. The Brits won the initiative?? yeh right!! They did for every turn of the game!!
2. In true Zulu fashion, both horns (flanks) of the Brits moved forward to attack, while the centre stayed still......hhhmmm???

Surj's Hessian's all move forward.

We deliberatly place my 2 artillery close to each other so we could combine their fire if
we needed too.

On our left we placed our Militia brigade
There were a lot of quality troops heading their way??

The Brits moved first and they now pushed their centre forward
So we just had to advance ours too, Ian also sent some of his troops towards the flank of the oncoming Hessians, while my reserve troops came off the
hill to support Ian's advance.

The perfect defensive position, helped by the rough ground just in front of the hill.

The exposed Hessian flank.

I had a little luck this round with my artillery.
Shooting at the Grenadiers needing 5's & 6's, I threw 4 dice and got 4 kills and at the 37th Foot
5 dice and 5 kills!!!!
The Brits weren't impressed!
Unlike me and Ian!

Now it was Ian's turn with the dice, the Hessains lost 6 figures to combined musket and artillery fire!!

A closeup shot of the action.

A few shots from the opposite side of the table.
The 42nd look pretty ominous??

Surj trying to avoid the rough ground.

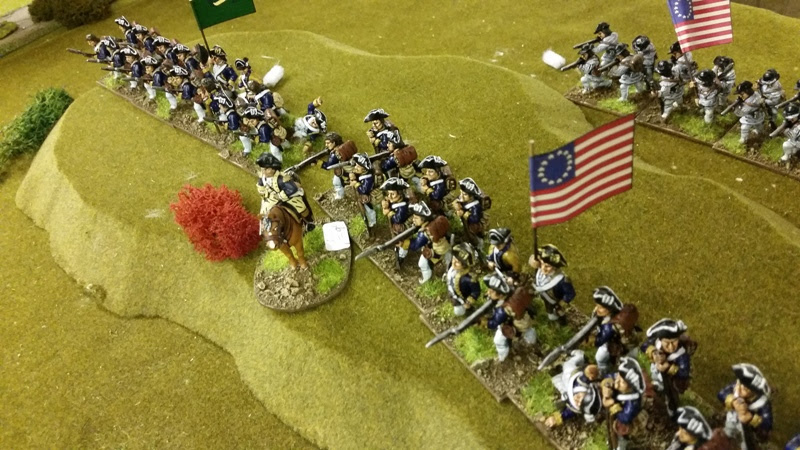
The 57th foot bravely advance towards the American lines

The 1st Royal Deux-Ponts

Surj's Hessian Jagers roll around our flank unopposed.

The 54th Foot hop over the fence into the corn field.

We decided Mr Washington would serve best over by my Militia??

All's looking good for us, as I turn to try and flank the 37th

But the Brits turn easily and we gave fire....... as they charged!!

.............as they charged!!

A nice straight line.

Hang on? Where's everyone gone?
In a pretty bloody fight, we both win and lose one melee each.

But then disaster for the Brits,they fail their Brigade Morale check and all troops
fall back broken. The 57th disperse as they were already routing due to losing the melee.

The British centre, all in retreat.

And just to rub salt in to their wounds, the Hessian unit Prinz Carl flees after failing its
morale too, leaving Ian to charge the Hessian artillery.

John's Brits reach the fence line

The Brits fail another check and the 37th flee the field, so I advanced.
Its not looking good for the British??

Surj is trying for our flank, but there's not a lot of room.

On our extreme left flank, the dismounted 17th Light Dragoons give fire.

The Militia form a fairly decent line, its now time to move out of the British
troops way....me thinks???

Is that a semi-naked lady I see before my eyes???

1st Rhode Island

42nd Highlanders

Now its our turn for a disaster, John throws a superb roll and knocks 8 casualties from
the 1st New York!! Who dissolve from the battlefield....oops!
So could the battle now swing back in favour of the British??

No.
Surj promptly then failed a brigade check on the Hessians, who were all forced back, and
effectively out of the game.

So there the game ended, in an American victory.
With the loss of their centre and left flank the British retired from the field.
Conclusion
Well what a difference a day makes??
It seems both myself and Ian did learn a few lessons from the last game. We had a plan and managed to stick to it. It was always going to be hard for the British as they were outnumbered, but I just don't get why they set up as they did, overloading their flanks and leaving their centre so exposed. They should have condensed their lines, THAT, is easy for me to say!!
Nice one Ray!
ReplyDeleteCheers Fran!
ReplyDeleteNice one Ray, great pictures!
ReplyDeleteCheers Sander!
Deletegreat report, weird deployment though - bit like fighting 2 very small armies
ReplyDeleteYeh, it did seem that way??
DeleteWell done!
ReplyDeleteThe Brits weren't impressed with five for five kills? To heck with them!
No, they weren't hehehe!
DeleteSome devasting volley fire. Great looking game once more
ReplyDeleteThanks Sgt!
DeleteReally nice looking game and report Ray!
ReplyDeleteGlad you enjoyed the report Rodney!
DeleteGreate looking game and AAR
ReplyDeleteCheers Michael!
DeleteWhat a splendid battle, what a great report with beautiful armies...Just one regret, no answer to the question of the 'semi-naked lady', no picture?
ReplyDeleteExcellent and epic!
She's there Phil, showing her bare chest, one of the artilleymen or I should say artilleywomen??
DeleteThat is a fantastic looking setup. Nice to see that you managed to reverse the outcome this time.
ReplyDeleteYep, we were as pleased as we were relieved.
DeleteWonderful looking game Ray!
ReplyDeleteCheers Rodger!
DeleteThat looks rather splendid.
ReplyDeleteCheers Paul!
DeleteGreat looking game! The AWi is a fun period to play!
ReplyDeleteCertainly is Cory!
DeleteWould love to have played in that game... I recognise some of the flags from Warflag.com.. :o) Brit plan was good until they advanced the centre into engagement - if they'd kept them just outside of musket range they would have provided support to the battering rams on the flanks, while not putting themselves in danger of the moral checks???
ReplyDeleteI think that was their original plan? If they didn't advance in the centre, we would have to have done ourselves. And yes,some very old flags from Warflag, soon to be replaced though. Posties spent a fortune on new flags from Flags of War!!
DeleteYet another great looking AWI game Ray and this time turning the tables!
ReplyDeleteChristopher
Yes, thank gawd!
DeleteIt is good to feel the thrill of victory. Now you can take some R&R.
ReplyDeleteFor a few weeks yes, then back to the Battlefield!!
DeleteExcellent Batrep mate for a great looking game. Well done on the victory, you needed that after the last game.
ReplyDeleteI did!!
DeleteThis was a great read with fab pictures. :)
ReplyDeleteThanks Piotr, glad you enjoyed it.
DeleteStars and stripes, stars and stripes!
ReplyDeleteYah!!!!
DeleteGreat report and nice looking game!
ReplyDeleteThanks Jonas!
DeleteExcellent Batrep Ray. Well done for the game and the pics!
ReplyDeleteCheers Paul.
DeleteVery impressive!
ReplyDeleteThanks Monty!!!
DeleteVery impressive game report Ray.Great Looking Figures! Congratulations to all you guys.
ReplyDeleteI feel with a bit more cavalry and General Hard Buckle Beano leading the charge the Brits would have swept the field. BB
You may have a point there Paul and just who is Gen Hard Buckle Beano when he's at home??
DeleteGreat pictures and battle report! Thanks for sharing!
ReplyDeleteGreetings
Peter
Thanks Peter!
Delete