Late last month the Rejects had what was our last game of the year. We had a special visitor for the day to, long lost Reject John came down from up north where he's moved to, to play his first game with the Rejects for 2 years. John likes Napoleonics, so Postie set up a cracker of a game for us.
The year is 1812 and we're in the Peninsular, a few days before the Battle of Salamanca. Wellington's army have set up camp when the French suddenly appear . A small Portuguese army have been sent for to help out the outnumbered British army.
Order of Battle
British c/o Earl of Wellington (Ray & Lee)
1st Division c/o Campbell
1st Brigade c/o Fermor
1/2nd Coldstream, 1/3rd Guards, 5/60th Line and 1 Medium Gun
2nd Brigade c/o Van Lowe
1st, 2nd, 5th Line KGL and 1 Medium Gun
3rd Brigade c/o Wheatley
2/24th, 1/42nd, 2/58th, 1/79th and 5/60th
4th Brigade c/o Pocks (Portuguese)
1st (2), 16th (2) Portuguese Line, 4th Cacadores
Cavalry Division c/o Stapleton-Cotton
5th Brigade c/o Alter
14th Light Dragoons, 1st Hussars KGL and Horse Artillery
6th Brigade c/o Bock
1st, 2nd Dragoons KGL
French c/o Marshal Marmont (John and Mark)
1st Division c/o Foy
1st Brigade c/o Chemineau
6th Leger (2), 69th Line (2), Medium Gun Battery
2nd Brigade co/ Berthelot
39th Line (2), 76th Line (2)
2nd Division c/o Clousel
3rd Brigade c/o Berlier
25th Leger (3), 27th Line (2) and Medium Gun Battery
4th Brigade c/o Barbot
50th Line (2), 59th Line (2) and Medium Gun Battery
Heavy Cavalry Division c/o Boyers
5th Brigade
6th Dragoons, 11th Dragoons
6th Brigade
15th Dragoons, 25th Dragoons and Horse Artillery
Light Cavalry Division c/o Curtos
7th Brigade
3rd Hussars, 13th Chasseurs a cheval
8th Brigade
26th Chasseurs a cheval, 28th Chasseurs a cheval
The British centre, their camp
2 units of KGL Dragoons
Portuguese heading form the right flank towards the camp.
The British Cavalry
14th Light Dragoons and 1st KGL Hussars
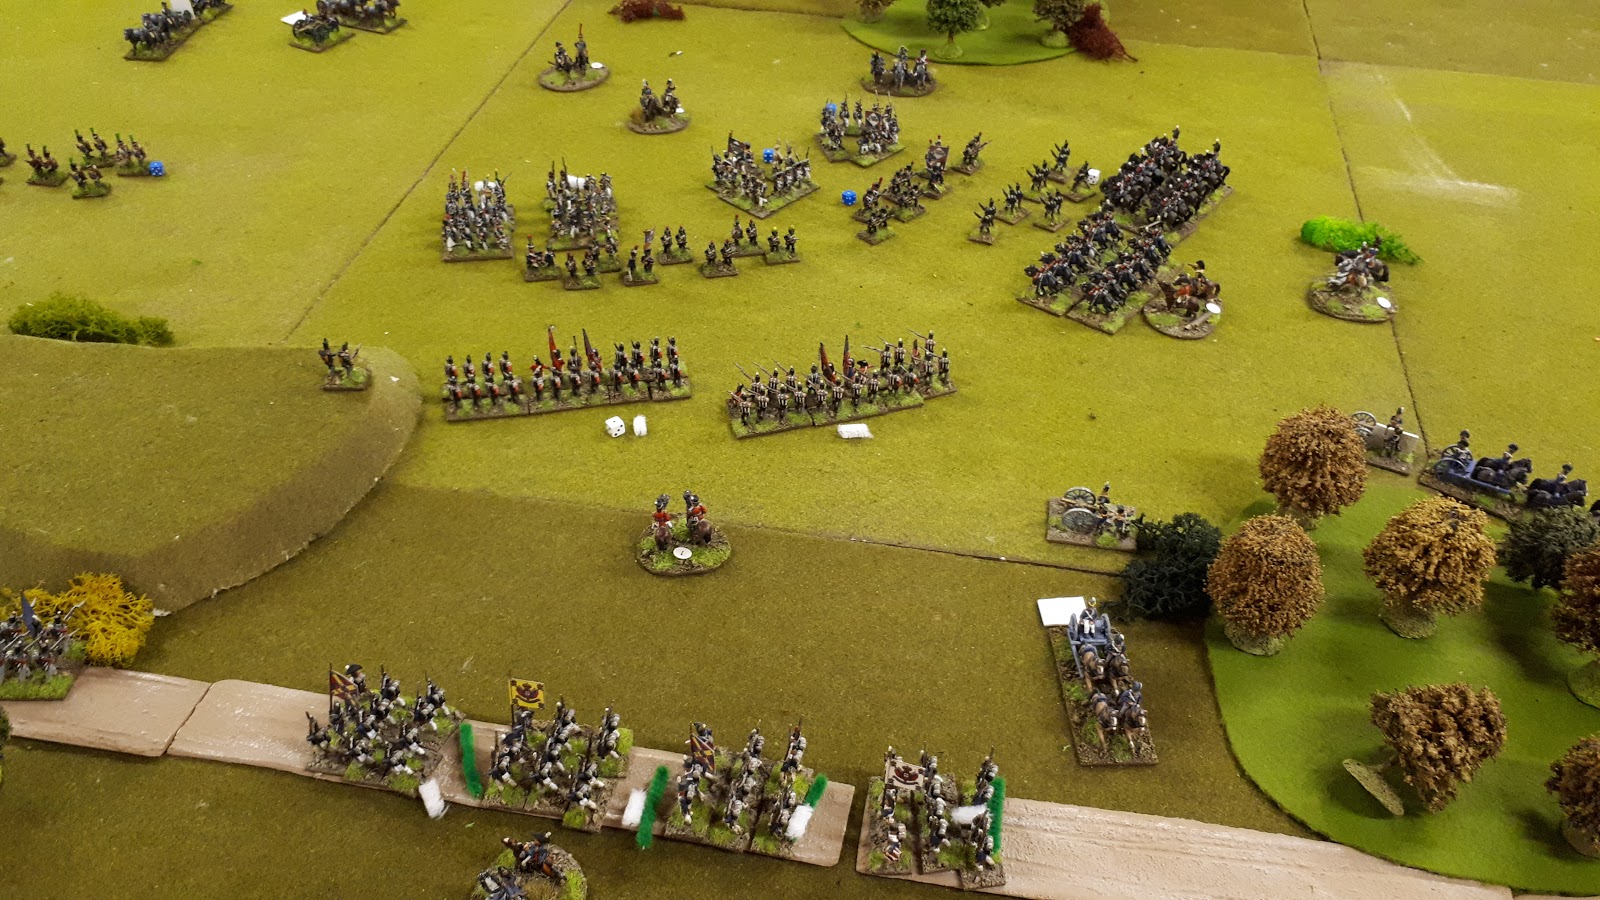
The centre
Lee's command was the troops on the hill and to the left of it.
Mine was to the right of the hill. With 2 large units of just to the right of the hill.
Our Commander the Earl of Wellington
The KGL Dragoons
Our worry was our left flank, which was pretty much open as you can see.
The plan was to protect the flank with his best troops the elite 42nd and 79th Highlanders.
There wasn't a lot of movement from the Brits, only my Cavalry, moving up
to attack Smiffy's cavalry
As our Horse were outnumberd I decided to move up the KGL Dragoons to support
my cavalry attack.
The French attack led by the 7th Brigade
The 3rd Hussars and 13th Chasseurs a Cheval
Postie and John
Charge!!!!
They might make the charge in a turn or two??
But they might not need too.
I win both melees resoundingly both French units route!!!
Get in!!!
And follow up, straight into the now disordered French Chasseurs!
Smiffy's dice for want of a better word were pathetic.
I beat both of his units again who both retreat through their routing friends.
Myself and Lee were very worried about this flank, we weren't anymore!!!
ANd to add insult to injury Smiffy then failed a morale check
causing the 7th Brigade to dissolve!!!
So now this flank looks pretty open, I wonder if we can force it??
The French infantry advance. We thought they'd push all the infantry to the hill. I'm glad they
didn't. Smiffy's troops are heading toward the Guard.
John brings the French Heavy Horse forward, while Lee fills in the gap with our Highlanders.
Meanwhile back over on our right flank, Smiffy unlimbers a gun and prepares to form square.
The Guard are twiddling their thumbs, waiting for the French. Come on Smiffy, I
wanna see how they fight.
That's a lot of French!
Hmm? What shall I do with my KGL Dragoons?
That French flank looks rather tempting???
The KGL move around to threaten the French flank, while the Portuguese move
in to support the Guards.
John Horse are in charge range, we made a tactical decision Not, to go into square,
it was a gamble, but if Lee threw well, we should/could stop the charge?
Smiffy pulls back another infantry unit, which was music to my ears.
I decided to move around the back .
John makes it up the hill
And on the left of the hill too!!
The Guards hold the first fire, I can't possible waste this shot on skirmishers.
Oh God, I knew things were going too well.
John charges the line on the hill and Lee fails their morale check, before firing a shot.
But Lee's dice roll was a lot better shooting at the Cavalry
My Dragoons moving around the flank has stopped the French advance.
So I advanced my Guards.
Even though Lee knocked 4 figures off the French Dragoons, they still charged in but
were sent packing in the melee.
Our dodgy plan paid off!
Thank Gawd!
I don't think the Guards will need the Portuguese, but Lee's troops on the hill might.
Smiffy forms square, which the KGL duly charge!!!
Not looking too clever on the hill?
I'm taking a chance here. The French get 4 extra dice for being in square but lose
the full effect of their fire.
John charges down hill hitting Lee's disordered unit.
A view of the camp, Wellies hardly moved all game.
One charge doesn't go to plan, surprisingly the smaller French unit wins the melee.
While I inflict 8 casualties on Smiffy's other square, see the dice below!!!!
This should just about kill off the French flank.
Smiffy's losing square routs while my KGL move back in order.
The French hit and....
Lee's pushed right back through the camp.
Not Good!
The Portuguese mount the hill, while the Guards surge forward.
Lee's army is disintegrating, he now has enemy colums in his rear.
This is gonna be close.
John sends in his Dragoons against the 79th and miraculously Lee wins again.
And there the game was called.....
Team Reject
Lee, Richard, John, Postie and Smiffy.
Nobody knew who'd won the game, the French thought we'd won, while me and Lee weren't so sure. But before he worked the points out some morale checks had to be made. John's 2nd Division who had effectively taken the hill lost severe casualties in doing so, so a check had to be made, which it failed. All the remaining units had to pull back 12 inches, which moved them all back over their side of the hill, basically giving to the Portuguese!!!
And so with the morale checks done the points were added up, it was sweaty lip time for all concerned!
We couldn't quite believe the outcome in the end, the French had been well and truly battered 11-31. With most of the points coming early on in the game when I smashed Smiffy's cavalry.
Here's Posties chart, not rubbing it in of course?
Conclusion
This was a very enjoyable game with twists and turns throughout. Not to blow our own trumpet, but I think we did outplay the French, we certainly out threw them! I was lucky against Smiffy's cavalry, this freed up our entire right flank and forced Smiffy to stop his attack and go into defence. We took a gamble not putting our Highlanders in square which more than paid off, stopping John's attack.
I do think they made a mistake not combining all the infantry to attack the hill. That's what I would have done, but I'm rather glad they didn't.
Great game von Postie!